

Tuesday, October 29, 2013
Monday, October 28, 2013
Real life is always better than the photo

I put it on the windowsill for more natural light, and I stood close, then I stood a bit away, then a lot away. And I kept snapping pictures of it. But every picture makes it look kinda herky-jerky and weirdly shaped.
So I am looking at the real thing on my desk and it is cute and sparkly and it was fun to make. But the picture is making it look sad.
So watch this space. I'm going to make another one, with more shapes and less dramatic changes in shape-size. Maybe that will help. But guess what, I will be using silver glimmer paper and lots of Dazzling Details to make it sparkly.
Happy Stamping,
Dee Tollaksen
Sunday, October 27, 2013
Welcome to Stampin' Up!

I was able to get a couple actual, hand made cards in the mail! I hope I remembered all of you, but even if these pretty balloons didn't arrive by snail mail, I am thrilled to have these ladies on my team!
Happy Stamping,
Dee Tollaksen
Saturday, October 26, 2013
Creepy burnished glitter for Halloween

The sparkly pumpkin here is a new technique, to me. Burnished glitter, and it was kind of fun!
I used an adhesive sheet and Pumpkin Pie cardstock, punched with an oval. I removed the adhesive protective backing, layered the pumpkins and then doused them with fine orange glitter.
Then you just use your finger to burnish the glitter flat. Keep rubbing the glitter down into the adhesive and making it flat. It keeps the glitter from shedding off your project, makes the pumpkins more shiny than glittery and it is more subtle, like the Fall colors.
And the branch from Serene Silhouettes stamped in Crumbcake and Black, just enough of a creepy Halloween feeling! I had a great time experimenting with this technique. Let me know if you want to give it a try!
Happy Stamping,
Dee Tollaksen
Wednesday, October 23, 2013
Cutest Coffee Cup gift packaging
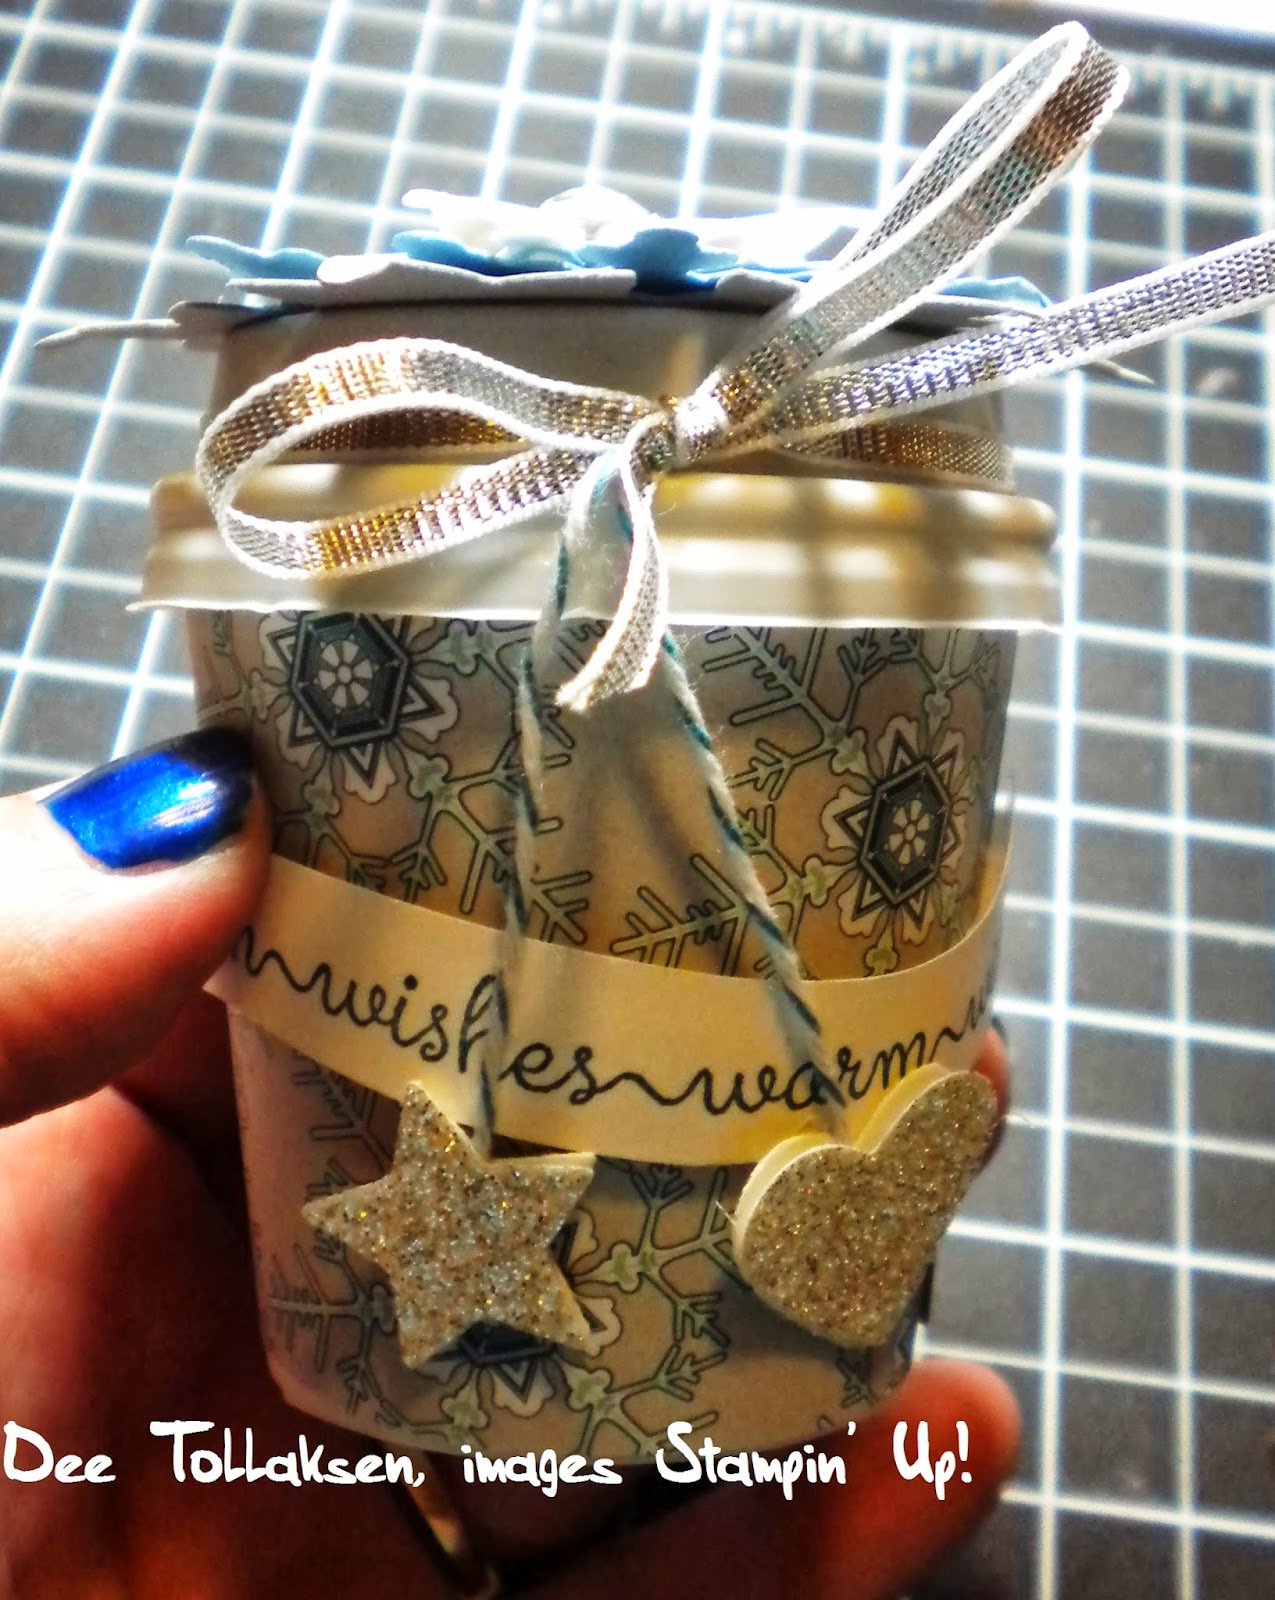
You can tell the holidays are just around the corner when the crafters start showing gift packaging! These darling little coffee cups are popping up on Pinterest and on the blogs, and they are irresistible!
I have taken a bit of Winter Frost DSP (designer series paper) and covered the cup. A length of Silver Ribbon wraps around the cup cover, with Bakers Twine dangling a silver glimmer star and heart. The warm wishes sentiment is from the Snow Day stamp set, so perfect!
But the fun fun fun is the top of this cup! I used the Festive Flurry stamps and matching Framelits to create a stack of beautiful snowflakes, then topped the whole thing with a large rhinestone.
 No tricky techniques or special products, but one fabulous gift package. So you can put a little bit of candy, or a K-cup for coffee but I strongly recommend diamond jewelry or silver coins stashed in this pretty package!
Happy Stamping,
Dee Tollaksen
Tuesday, October 22, 2013
25th Anniversary, 25 stamp sets at 25% off


Every one of these 25 stamps sets are discounted by 25% thru Oct. 28. If you wish to order online, you can participate in a "Mystery Hostess" order and I will award hostess rewards (free product) to one lucky shopper. Use this code NHHR23VB at www.dtollaksen.stampinup.net to place your order.
While there, check out the weekly specials, and look for the Thursday Stampin' Up! blog post that will have an additional sale for one day only!
 Any questions? Problems? Want to just let me place your order for you? Perfect! Call me or email me or leave a comment and I'll get back to you.
Happy Stamping!
Dee Tollaksen


Saturday, October 19, 2013
Basic card making lesson

Again, I love to "let the DSP (designer series paper) do the work." For this card we picked a pretty DSP and covered the card base, then selected some embellishments that coordinated. A length of ribbon and a doily die-cut prepare the card for a focal point. At this point you could go in a lot of different directions, think of two hearts stamped in bold Real Red with a wedding sentiment or valentine sentiment. Or a flower and a birthday or sympathy sentiment. My stampers wanted to try the markers, so we picked an outline image that can be colored. We used the coordinating sentiment, both from For The Birds stamp set. We popped an In Color Dahlia on the sentiment to tie-in with the coloring.
Easy Peasy and a design concept that can easily be adapted to any style or event!
Happy Stamping,
Dee Tollaksen
Tuesday, October 15, 2013
Self-designing card

Select a pretty DSP, then use a coordinating color of card stock as the base for the card. We used a shaped punch (or die on the Big Shot) to punch a hole in the DSP (or add a die cut to the front of the card). In this case it is the Fancy Flower Punch.
Select your sentiment, the Perfect Pairs stamp set offers so many little sentiments that work perfectly for any occasion. Also stamped in the same coordinating color, then punched with a circle punch.
Then embellish: we used some teeny little flower punches AND rhinestones, wow! A bit of bakers twine for some more texture at the top of the card. I think this color might be retired, but there are lots of options available.
And your card has designed itself, easy peasy!
Happy Stamping,
Dee Tollaksen


Monday, October 14, 2013
Spritzing fun

My favorite is this over size sentiment that can be the star of your project! You don't need much more on your card, I put a little butterfly on mine, punched from a scrap of DSP (designer series paper).
For this card I pulled out some watercolor paper because it stands up to moisture and doesn't warp or rip. And I planned to test it with a fun tool.
I stamped the image using VersaMark clear ink and heat embossed it with clear embossing powder. Then I grabbed my Stampin' Spritzer and filled it with alcohol and re-inker. I matched my cardstock base to the re-inker choice, any color will work. Then I spritzed my card, randomly adding color and not worrying about leaving areas lighter or darker.
I added a dark blue layer onto a light blue layer, but imagine it in red or green or pink, so cute and very versatile!
Happy Stamping,
Dee Tollaksen


Friday, October 11, 2013
Stash Bashing
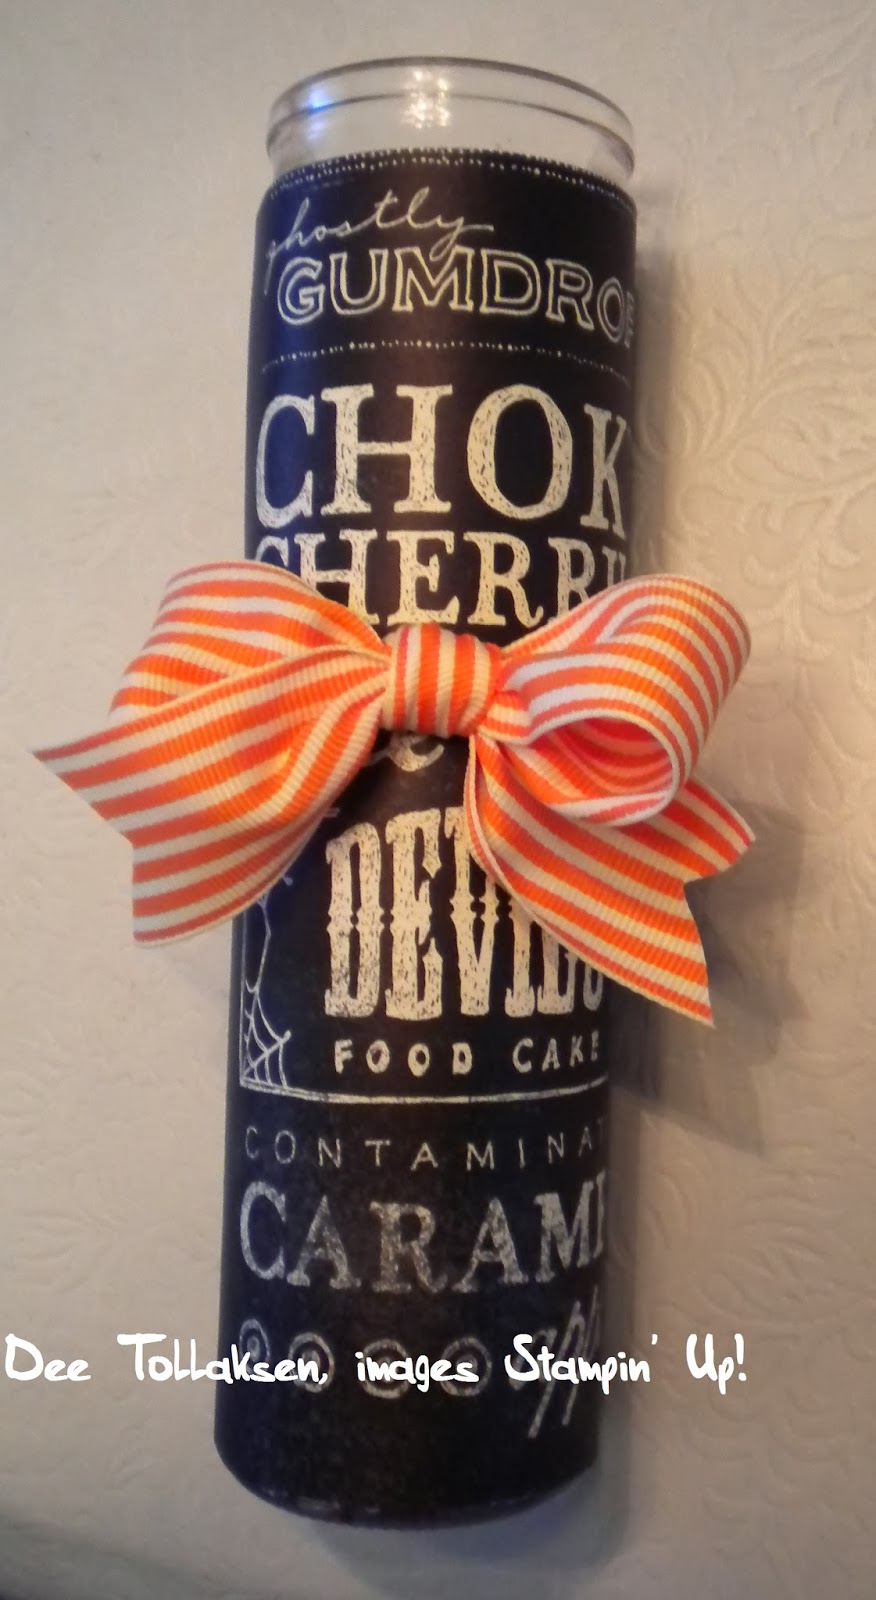 Easiest project ever! Do you have this striped ribbon in your stash? Stampin' Up! retired this gorgeous striped ribbon and that makes it even harder to part with the beautiful stuff, but I grit my teeth and used a foot of it, because it was perfect for this project.
I was cleaning a cabinet and found this tall candle stashed away. Honestly, I am sure it was a white elephant gift, because it has a religious label on it and I know I didn't buy it. So I pulled out my Witches Brew DSP (designer series paper) and roughly measured the height of the candle, wrapped it around the bottle and chopped off the extra width of the DSP. I used some strong double stick tape to hold the DSP to the candle. Wrap the ribbon and tie a bow. Ta-da!
Since then I spotted the candles at Wal-Mart, I'm sure they're widely available, and it makes a perfect Halloween Decoration, hostess gift during October and even a good idea for upcoming Thanksgiving or Christmas with different DSP.
Love it! But no stamping involved, LOL.
Dee Tollaksen
Thursday, October 10, 2013
Weekly Deals and Clearance Rack
 If I taught my children anything, it is frugal shopping. When you go into any retail store, start with the Clearance Rack. If you can find what you need on the clearance rack, why pay full price? So I LOVE that Stampin' Up! has added a clearance rack to the on-line store! Be sure to start there when doing your shopping. These items can go in your on-line cart or you can let me know that you want them and I will be happy to order them for you. Bear in mind that it is "while supplies last" and when gone, they're gone!
Weekly Deals are brand new and also available on-line or by contacting me. These are not limited supplies, but they are limited time offers. One week, starting on Monday, so mark your calendar! Pictured below are the six items on special this week. Embossing folder, punch, framelits, digital and paper piercing tools. The prices are shown when you put the item into your cart at the website, and they are nicely priced.
Click here to jump to my on-line store where you can click SHOP NOW to take a peek.


Happy Stamping,
Dee Tollaksen
Thank You Thursday
THANK YOU THURSDAY
Every week Stampin' Up! is offering a one day special called Thank You Thursday. Put any of these four DSP selections into your shopping cart TODAY and you will receive a nice discount. Or email me or call me, I will be happy to place the order for you and save a bit on shipping by combining with everyone else's orders!
Check back every Thursday in October for specials and don't forget to check the new "weekly specials" featured in the on-line Stampin' Up! store: www.dtollaksen.stampinup.net
As always, the discount will be applied at check-out!
 | This And That Epic Day DSP: 130814 Regular Price: $10.95 US/$13.50 CAN Discounted Price: $8.21 US/$10.12 CAN |
 | Soho Subway DSP: 130140 Regular Price: $10.95 US/$13.50 CAN Discounted Price: $8.21 US/$10.12 CAN |
 | I Am Me DSP: 130138 Regular Price: $10.95 US/$13.50 CAN Discounted Price: $8.21 US/$10.12 CAN |
 | Etcetera DSP: 130129 Regular Price: $10.95 US/$13.50 CAN Discounted Price: $8.21 US/ Happy Stamping, Dee Tollaksen |
Tuesday, October 8, 2013
Discount for everyone

Your first official order will have a bonus discount, totaling 30% off retail cost. The regular discount of 20% will be valid through the end of March. There is no penalty for dropping out.
Stampin' Up! is sweetening the deal with a free stamp set of your choice if you place a qualifying order within your first 30 days. We want to encourage you to start strong!
The offer is good through Oct 21, which is less than two weeks. Just post a comment or contact me by email or phone if you would like to join my team. We have fun monthly gatherings and we enjoy stamping together, but these are totally optional.
Happy Stamping!
Dee Tollaksen
Monday, October 7, 2013
Trick or treat

Maybe if I package them and add a pretty label and make a list of deserving children who I want to treat, maybe some of this candy won't make its way into my mouth!
I used the Chalk Talk framlits to cut black card stock, added a banner with the Num-Num sentiment, a glue dot holds the gorgeous black chevron ribbon and the Witches Brew Washi tape adds simple Halloween fun. Adhere the tag to a cello bag filled with Halloween treats and I am ready for the kids. Hurry and get here though, Sixlets are my fave!


Sunday, October 6, 2013
October Stamp Club card three

Selecting your color is a great place to start, a nice deep Cherry Cobbler is a great place to start. It would also be a great color for Christmas cards. And if you peek at the Clearance Rack on the Stampin' Up! site, you will see the 12 x 12" Cherry Cobbler Core'dinations card stock is unbelievably priced.
 We used the new Framelit to easily cut this flip-flop card. Start with a 6 x 6" piece of card stock and run it through your Big Shot, you'll get 4 cards out of one sheet of paper!
Then we used the clock, compass, gears and bits and pieces from the Clockworks Stamp set to make our own background, some postage stamps and the focal point.
Grab your Delightful Dozens stamp set for a sentiment, there are some great ones in this set. A sponge and the Crumb Cake ink pad to "age" the very vanilla pieces.
If you have the Hexagon punch, it will make all your flags or banners perfectly. I didn't think of it when making the sample, but the club members had it available. Nice, perfect flagged ends.
Hope this gives you a little inspiration when trying to create masculine cards!
Happy Stamping,
Dee Tollaksen


Subscribe to:
Posts (Atom)